SpringSecurity授权服务器、资源服务器
授权服务器
注意:之前的授权服务器框架 Spring security oauth2 官方已经不再维护了 参考以下资料 为什么你使用的 Spring Security OAuth 过期了?
所以这篇文章主要还是介绍旧的 Spring security oauth2 资源服务器
资源服务器是围绕着授权服务器进行的,在 oauth2 中当有了授权服务器以后,才会有资源服务器
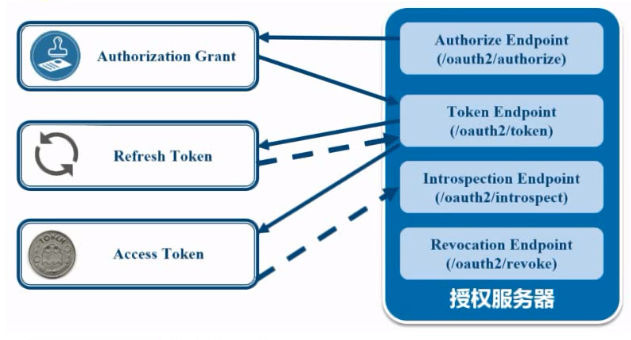
先来了解几个概念
Authorize Endpoint:授权端点,进行授权Token Endpoint:令牌端点,经过授权拿到对应的 TokenIntrospection Endpoint:校验端点,校验 Token 的合法性Revocation Endpoint:撤销端点,撤销授权
添加依赖
<!-- 这里使用的是 spring-cloud-starter-security 不是 SpringBoot的 -->
<!-- 挺神奇当的,默认的 springboot-oauth2 的一些方法注解是过期的,
但是 spring-cloud-starter-oauth2 却没有-->
<properties>
    <java.version>1.8</java.version>
    <!-- 注意 SpringBoot 的版本要对的上 -->
    <!-- 参考:https://spring.io/projects/spring-cloud#overview -->
    <spring.cloud-version>Hoxton.SR8</spring.cloud-version>
</properties>

<dependencyManagement>
    <dependencies>
        <dependency>
            <groupId>org.springframework.cloud</groupId>
            <artifactId>spring-cloud-dependencies</artifactId>
            <version>${spring.cloud-version}</version>
            <type>pom</type>
            <scope>import</scope>
        </dependency>
    </dependencies>
</dependencyManagement>

 <dependencies>
        <dependency>
            <groupId>org.springframework.cloud</groupId>
            <artifactId>spring-cloud-starter-security</artifactId>
        </dependency>

        <dependency>
            <groupId>org.springframework.cloud</groupId>
            <artifactId>spring-cloud-starter-oauth2</artifactId>
        </dependency>
        <!-- 一些其他的基本依赖就省了(例如 SpringBoot 启动器) -->
</dependencies>
配置 Security
自定义一个 UserDetails 实现类
public class MyUser implements UserDetails {
    private final String password;

    private final String username;

    private final List<GrantedAuthority> authorities;

    public MyUser(String password, String username, List<GrantedAuthority> authorities) {
        this.password = password;
        this.username = username;
        this.authorities = authorities;
    }

    @Override
    public Collection<? extends GrantedAuthority> getAuthorities() {
        return authorities;
    }
    // 略,总之把 false 都改成 true
}
配置登陆服务 UserDetailsService
@Service
public class UserService implements UserDetailsService {
    @Autowired
    private PasswordEncoder passwordEncoder;

    @Override
    public UserDetails loadUserByUsername(String username) throws UsernameNotFoundException {
        String password = passwordEncoder.encode("admin");
        return new MyUser(username, password, AuthorityUtils.commaSeparatedStringToAuthorityList("admin"));
    }
}
配置 Security 认证
@Configuration
@EnableWebSecurity
public class SecurityConfig extends WebSecurityConfigurerAdapter {
    @Bean
    public PasswordEncoder passwordEncoder() {
        return new BCryptPasswordEncoder();
    }

    @Override
    protected void configure(HttpSecurity http) throws Exception {
        http.authorizeRequests()
                // 这里放行了 oauth,其是专门用来授权的接口
                .antMatchers("/oauth/**","/login/**","/logout/**").permitAll()
                .anyRequest().authenticated()
                .and()
                // 表单请求放行
                .formLogin().permitAll()
                .and()
                .csrf().disable();
    }
}
配置授权服务器
@Configuration
@EnableAuthorizationServer
public class AuthorizationServerConfig extends AuthorizationServerConfigurerAdapter {
    @Autowired
    private PasswordEncoder passwordEncoder;

    @Override
    public void configure(ClientDetailsServiceConfigurer clients) throws Exception {
        // 这个 clients 指的是请求的那个客户端
        clients
                // 写到内存
                .inMemory()
                // 客户端 ID
                .withClient("client")
                // 密钥(这里需要加密一下)
                .secret(passwordEncoder.encode("this_is_secret_key"))
                // 重定向地址
                .redirectUris("https://alsritter.icu/")
                // 授权范围
                .scopes("all")
                // 授权类型  authorization_code:授权码模式
                .authorizedGrantTypes("authorization_code");

    }
}
资源服务器
配置资源服务器
@Configuration
@EnableResourceServer
public class ResourceServerConfig extends ResourceServerConfigurerAdapter {
    @Override
    public void configure(HttpSecurity http) throws Exception {
        http.csrf().disable()
                .authorizeRequests()
                .antMatchers("/user/**").permitAll()
                .anyRequest().authenticated();
    }
}
测试 Controller
@RestController
@RequestMapping("/user")
public class UserController {
    @GetMapping("/getCurrentUser")
    public Object getCurrentUser(Authentication authentication) {
        // 这个返回的实际上就是自定义登陆逻辑里的 User 类
        return authentication.getPrincipal();
    }
}
authorizeRequests 顺序
参考资料 老大差点拿我祭旗!Spring Security authorizeRequests顺序问题不容忽视
authorizeRequests() 所创建的 RequestMatcher 是有顺序的。最终的 OrRequestMatcher 逻辑则是,谁先匹配,就交给谁。
所以一般都是把 anyRequest().authenticated() 放在最后面
requestMatchers 的作用
参考资料 Spring requestMatchers, antMatchers and authorizeRequests usage
这个 requestMatchers 单独拿出来用毫无意义,一般是搭配 authorizeRequests 使用的
http
    .requestMatchers().antMatchers("/", "/login")
    .and()
    .authorizeRequests().anyRequest().authenticated();
上述的代码表示允许 / 和 /login 直接通过,就如上面 authorizeRequests 顺序 那节所说,先匹配就交给谁。
资源服务器过滤器的顺序
参考资料 Spring 的 WebSecurityConfigurerAdapter 过滤器
配置资源服务器时会发现在 ResourceServerConfigurerAdapter 上配置了访问控制,而之前在 WebSecurityConfigurerAdapter 也配置了访问控制,所以这两个的校验谁先谁后呢?
点开 WebSecurityConfigurerAdapter 可以发现其默认的 Order 设置为 100
@Order(100)
public abstract class WebSecurityConfigurerAdapter implements
        WebSecurityConfigurer<WebSecurity> {
            ...
而 ResourceServerConfigurerAdapter 则是 3
@Configuration
public class ResourceServerConfiguration extends WebSecurityConfigurerAdapter implements Ordered {

    private int order = 3;
    ...
在 Spring 里 Order 值越小优先级越高,所以 ResourceServerConfigurerAdapter 优先级比另外一个更高,他会优先处理。
测试授权码模式
这个测试是基于上面的配置的
获取授权码
先获取授权码
http://localhost:8080/oauth/authorize?response_type=code&client_id=client&redirect_uri=https://alsritter.icu/&scope=all
上面的链接解释一下
oauth/authorize授权服务器(这个地址是指定的)response_type=code表示期望获取授权码client_id=client客户端id(要和授权服务器的一样)redirect_uri重定向的地址scope作用域
登陆后会跳转到如下页面
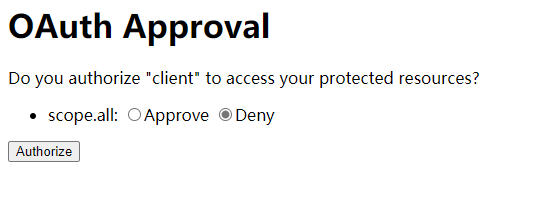 它会询问你是否允许 client 访问被保护的资源
点击允许后会重定向到之前指定的链接,且返回一个 code
# 重定向到如下地址

https://alsritter.icu/?code=XCMxjE
# 因为上面 redirect_uri 我填的是我的博客,所以会重定向到这里
# 关键是看后面跟着的这个 code=XCMxjE 这个就是授权码
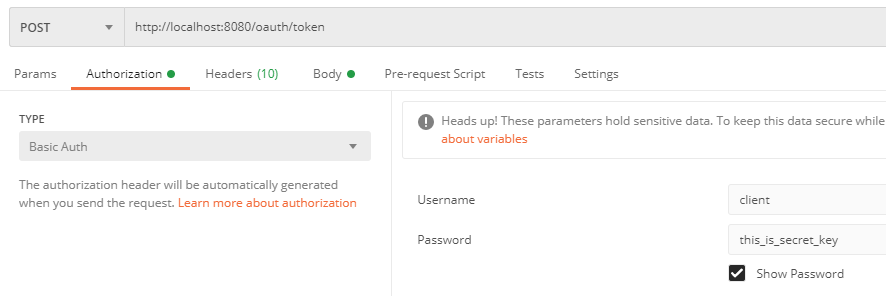
获取令牌
获取授权码后进行下一步
先在 Authorization 输入 username 和 password,这里的 username 就是上面的客户端 id,密码就是那个密钥
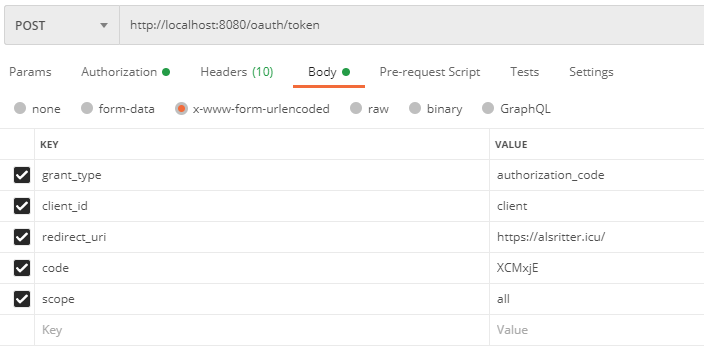
然后再在表单添加
这个请求的请求头如下(这个 Authorization 字段后面的内容是通过 Base64 编码过的,解码后其内容为 client:this_is_secret_key)
Authorization: Basic Y2xpZW50OnRoaXNfaXNfc2VjcmV0X2tleQ==
User-Agent: PostmanRuntime/7.26.5
Accept: */*
Cache-Control: no-cache
Postman-Token: 1f7335a2-6096-4a3d-b1a1-1de82ea6f9b8
Host: localhost:8080
Accept-Encoding: gzip, deflate, br
Connection: keep-alive
Content-Type: application/x-www-form-urlencoded
Content-Length: 112
请求体如下
grant_type: "authorization_code"
client_id: "client"
redirect_uri: "https://alsritter.icu/"
code: "XCMxjE"
scope: "all"
最后就取得了 Token
{
    "access_token": "2f58098c-af89-4d7c-b670-5e02d5f9d9bd",
    "token_type": "bearer",
    "expires_in": 43199,
    "scope": "all"
}
使用 Token 获取资源
使用这个 Token 去获取资源服务器的资源
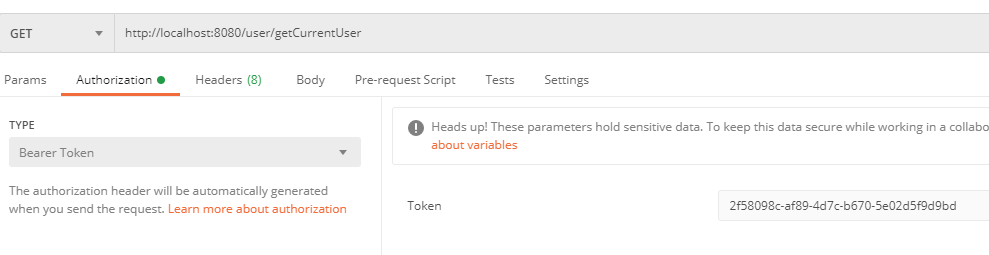
请求头为
Authorization: Bearer 2f58098c-af89-4d7c-b670-5e02d5f9d9bd
User-Agent: PostmanRuntime/7.26.5
Accept: */*
Cache-Control: no-cache
Postman-Token: 00784871-7b05-4ef3-ad68-fb82c392b70f
Host: localhost:8080
Accept-Encoding: gzip, deflate, br
Connection: keep-alive
密码模式
添加配置
先在 WebSecurityConfigurerAdapter 注入 AuthenticationManager
@Configuration
@EnableWebSecurity
public class SecurityConfig extends WebSecurityConfigurerAdapter {
    @Bean
    @Override
    public AuthenticationManager authenticationManager() throws Exception {
        return super.authenticationManager();
    }
    ...
然后再在授权服务器加上这个端点
@Configuration
@EnableAuthorizationServer
public class AuthorizationServerConfig extends AuthorizationServerConfigurerAdapter {
    @Autowired
    private AuthenticationManager authenticationManager;

    @Override
    public void configure(AuthorizationServerEndpointsConfigurer endpoints) throws Exception {
        endpoints.authenticationManager(authenticationManager);
    }
    ...
然后别忘记在授权类型里加上这个密码模式
// 支持多种模式
.authorizedGrantTypes("authorization_code","password");
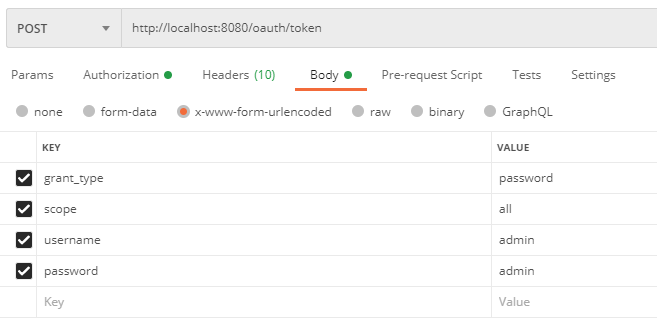
获取令牌
把上面的改成如下(别忘了加上 Authorization)
请求头
Authorization: Basic Y2xpZW50OnRoaXNfaXNfc2VjcmV0X2tleQ==
User-Agent: PostmanRuntime/7.26.5
Accept: */*
Cache-Control: no-cache
Postman-Token: 2fab209a-d3ca-460c-82e7-82e53a539cd5
Host: localhost:8080
Accept-Encoding: gzip, deflate, br
Connection: keep-alive
Content-Type: application/x-www-form-urlencoded
Content-Length: 59
请求体
grant_type: "password"
scope: "all"
username: "admin"
password: "admin"
JWT 整合到 Oauth
默认 Security 采用的是 Cookie 认证机制,搭配服务端的 Session 使用;通过客户端带上来的 Cookie 对象与服务端的 Session 对象匹配来实现状态管理(默认每当关闭浏览器时 Cookie 都会被删除,如果需要保留一段时间可以使用 Cookie 的 expire time 使 Cookie 存留一段时间)
JWT 的具体细节就不再赘述了,之前那篇 JWT 使用方法那里已经讲过了,这里使用这个 JWT 的原因是因为其能 使资源服务器不再依赖认证服务器即可完成授权,但是 JWT 令牌还是有个占用存储空间大的缺点的
整合到 Oauth
先把 JWT 的 Store 注入
@Configuration
public class JwtTokenStoreConfig {
    @Bean
    public TokenStore jwtTokenStore() {
        return new JwtTokenStore(jwtAccessTokenConverter());
    }

    @Bean
    public JwtAccessTokenConverter jwtAccessTokenConverter() {
        // 创建一个转换器
        JwtAccessTokenConverter jwtAccessTokenConverter = new JwtAccessTokenConverter();
        // 设置 jwt 密钥
        jwtAccessTokenConverter.setSigningKey("test_key");
        return jwtAccessTokenConverter;
    }
}
还是像上面配置 Redis 那样在 AuthorizationServerConfigurerAdapter 配置这个存储模式,不过这次不用再使用 Redis 了
@Autowired
@Qualifier("jwtTokenStore")
private TokenStore tokenStore;

@Autowired
private JwtAccessTokenConverter jwtAccessTokenConverter;

@Override
public void configure(AuthorizationServerEndpointsConfigurer endpoints) throws Exception {
    endpoints.authenticationManager(authenticationManager)
            .tokenStore(tokenStore)
            // 需要使用之前注入的转换器(将 accessToken 转成 JwtToken)
            .accessTokenConverter(jwtAccessTokenConverter);
}
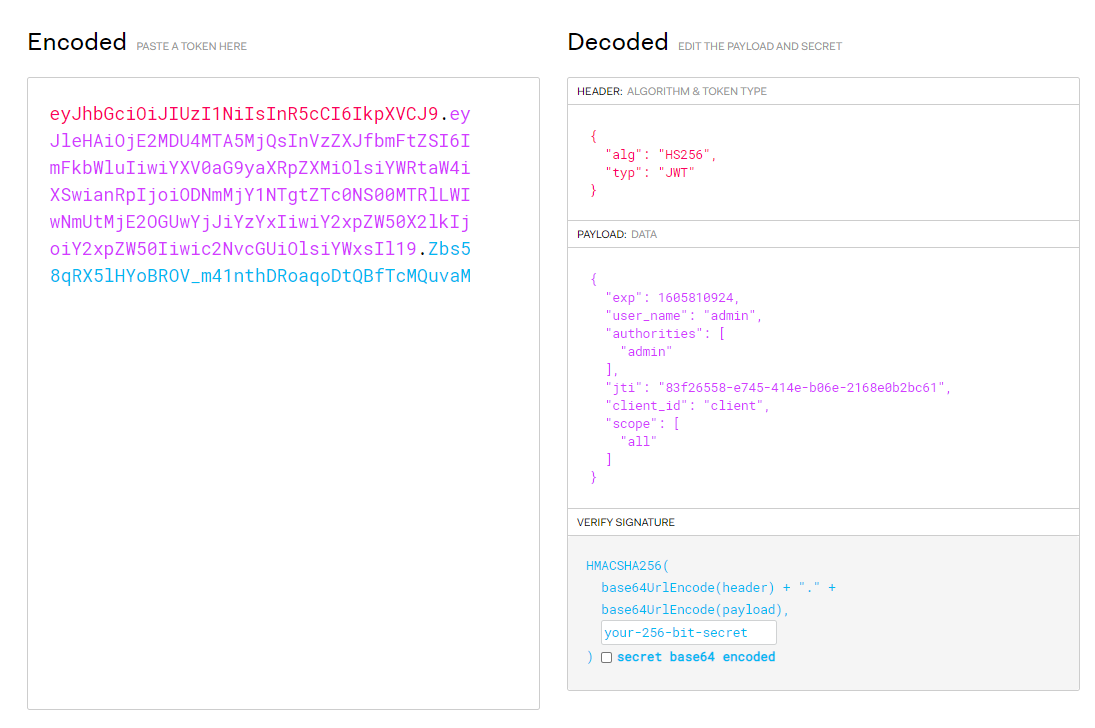
然后再次访问授权服务器就能看到返回的 Token 变成了 JWT
{
    "access_token": "eyJhbGciOiJIUzI1NiIsInR5cCI6IkpXVCJ9.eyJleHAiOjE2MDU4MTA5MjQsInVzZXJfbmFtZSI6ImFkbWluIiwiYXV0aG9yaXRpZXMiOlsiYWRtaW4iXSwianRpIjoiODNmMjY1NTgtZTc0NS00MTRlLWIwNmUtMjE2OGUwYjJiYzYxIiwiY2xpZW50X2lkIjoiY2xpZW50Iiwic2NvcGUiOlsiYWxsIl19.Zbs58qRX5lHYoBROV_m41nthDRoaqoDtQBfTcMQuvaM",
    "token_type": "bearer",
    "expires_in": 43199,
    "scope": "all",
    "jti": "83f26558-e745-414e-b06e-2168e0b2bc61"
}
把这个 Token 粘贴到上面的 JWT 官网的解析器可以看到结果如下
拓展 JWT 里内容
如果直接在 JWT 添加内容不复杂,但是使用了 Security 框架拓展就比较麻烦了
这里增加内容的原理就是先在 OAuth2AccessToken 接口默认的实现类 DefaultOAuth2AccessToken 里面添加内容,然后再在配置类 AuthorizationServerConfigurerAdapter 里给这些添加的部分也指定为 JWT 的转换器。
先创建一个增强类
public class JwtTokenEnhancer implements TokenEnhancer {
    @Override
    public OAuth2AccessToken enhance(OAuth2AccessToken accessToken, OAuth2Authentication authentication) {
        Map<String, Object> map = new HashMap<>();
        map.put("myInfo","this is my info");
        // 强转成 DefaultOAuth2AccessToken,这个类是 OAuth2AccessToken 接口的默认实现类,
        // 如果要添加内容一般都是先转成这个类,再通过它的 setAdditionalInformation 方法
        // 添加自定义的内容,最后在配置类那里为这个 TokenEnhancer 指定一个相应的转换器
        ((DefaultOAuth2AccessToken)accessToken).setAdditionalInformation(map);
        return accessToken;
    }
}
然后再在 JwtTokenStoreConfig 注入这个增强器
@Bean
public JwtTokenEnhancer jwtTokenEnhancer() {
    return new JwtTokenEnhancer();
}
在 AuthorizationServerConfigurerAdapter 配置这个增强器
@Autowired
@Qualifier("jwtTokenEnhancer")
private TokenEnhancer tokenEnhancer;

@Override
public void configure(AuthorizationServerEndpointsConfigurer endpoints) throws Exception {
    // 设置 JWT 增强的内容
    TokenEnhancerChain chain = new TokenEnhancerChain();

    List<TokenEnhancer> delegates = new ArrayList<>();
    delegates.add(tokenEnhancer);
    // 因为上面本质也只是先在 accessToken 上添加内容,所以这里也要指定其转换器
    delegates.add(jwtAccessTokenConverter);
    chain.setTokenEnhancers(delegates);

    endpoints.authenticationManager(authenticationManager)
            .tokenStore(tokenStore)
            // 需要使用之前注入的转换器(将 accessToken 转成 JwtToken)
            .accessTokenConverter(jwtAccessTokenConverter)
            // 使用增强器
            .tokenEnhancer(chain);
}
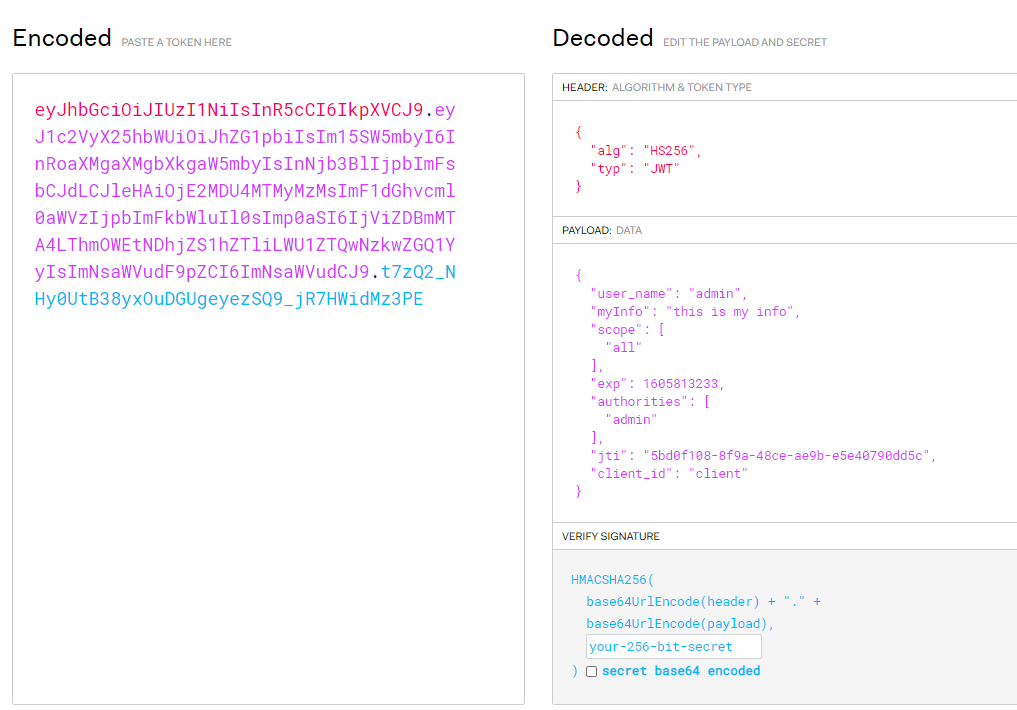
再次去请求这个授权服务器返回值可以看到这里多了个 myInfo 字段
{
    "access_token": "eyJhbGciOiJIUzI1NiIsInR5cCI6IkpXVCJ9.eyJ1c2VyX25hbWUiOiJhZG1pbiIsIm15SW5mbyI6InRoaXMgaXMgbXkgaW5mbyIsInNjb3BlIjpbImFsbCJdLCJleHAiOjE2MDU4MTMyMzMsImF1dGhvcml0aWVzIjpbImFkbWluIl0sImp0aSI6IjViZDBmMTA4LThmOWEtNDhjZS1hZTliLWU1ZTQwNzkwZGQ1YyIsImNsaWVudF9pZCI6ImNsaWVudCJ9.t7zQ2_NHy0UtB38yxOuDGUgeyezSQ9_jR7HWidMz3PE",
    "token_type": "bearer",
    "expires_in": 43199,
    "scope": "all",
    "myInfo": "this is my info",
    "jti": "5bd0f108-8f9a-48ce-ae9b-e5e40790dd5c"
}
丢去解析可以看到在 JWT 里面也多了这个 myInfo 字段
解析 JWT 内容
先引入 JJWT 的依赖
<!-- https://mvnrepository.com/artifact/io.jsonwebtoken/jjwt -->
<dependency>
    <groupId>io.jsonwebtoken</groupId>
    <artifactId>jjwt</artifactId>
    <version>0.9.1</version>
</dependency>
就是读取请求头的 Authorization 字段
Authorization: Bearer eyJhbGciOiJIUzI1NiIsInR5cCI6IkpXVCJ9.eyJ1c2VyX25hbWUiOiJhZG1pbiIsIm15SW5mbyI6InRoaXMgaXMgbXkgaW5mbyIsInNjb3BlIjpbImFsbCJdLCJleHAiOjE2MDU4MTMyMzMsImF1dGhvcml0aWVzIjpbImFkbWluIl0sImp0aSI6IjViZDBmMTA4LThmOWEtNDhjZS1hZTliLWU1ZTQwNzkwZGQ1YyIsImNsaWVudF9pZCI6ImNsaWVudCJ9.t7zQ2_NHy0UtB38yxOuDGUgeyezSQ9_jR7HWidMz3PE
在 Controller 里可以取得这个 JWT 并解析
@GetMapping("/getCurrentUser")
public Object getCurrentUser(HttpServletRequest request) {
    String header = request.getHeader("Authorization");
    // 因为 indexOf 返回的是第一次出现的位置,而 bearer 为 6,其后面跟一个空格,因此从第七个开始取
    String token = header.substring(header.indexOf("bearer") + 7);
    return Jwts.parser()
            // 这里后面的部分是为了防止乱码
            .setSigningKey("test_key".getBytes(StandardCharsets.UTF_8))
            .parseClaimsJws(token)
            .getBody();
}
刷新令牌
参考资料 问题备忘:Spring Cloud OAuth2.0 开发过程中碰到的问题
先在 AuthorizationServerConfigurerAdapter 配置令牌失效时间(注意这里要加上刷新令牌)
@Override
public void configure(ClientDetailsServiceConfigurer clients) throws Exception {
    // 这个 clients 指的是请求的那个客户端
    clients
            // 写到内存
            .inMemory()
            // 客户端 ID
            .withClient("client")
            // 密钥(用来请求授权服务器的)
            .secret(passwordEncoder.encode("this_is_secret_key"))
            // 授权范围
            .scopes("all")
            // 授权类型为密码模式,然后使用刷新令牌
            .authorizedGrantTypes("password", "refresh_token")
            // 设置失效时间为 10 分钟
            .accessTokenValiditySeconds(60 * 10)
            // 设置刷新令牌过期时间
            .refreshTokenValiditySeconds(60 * 60 * 24 * 7);
}
返回值如下,可见多了一个刷新令牌
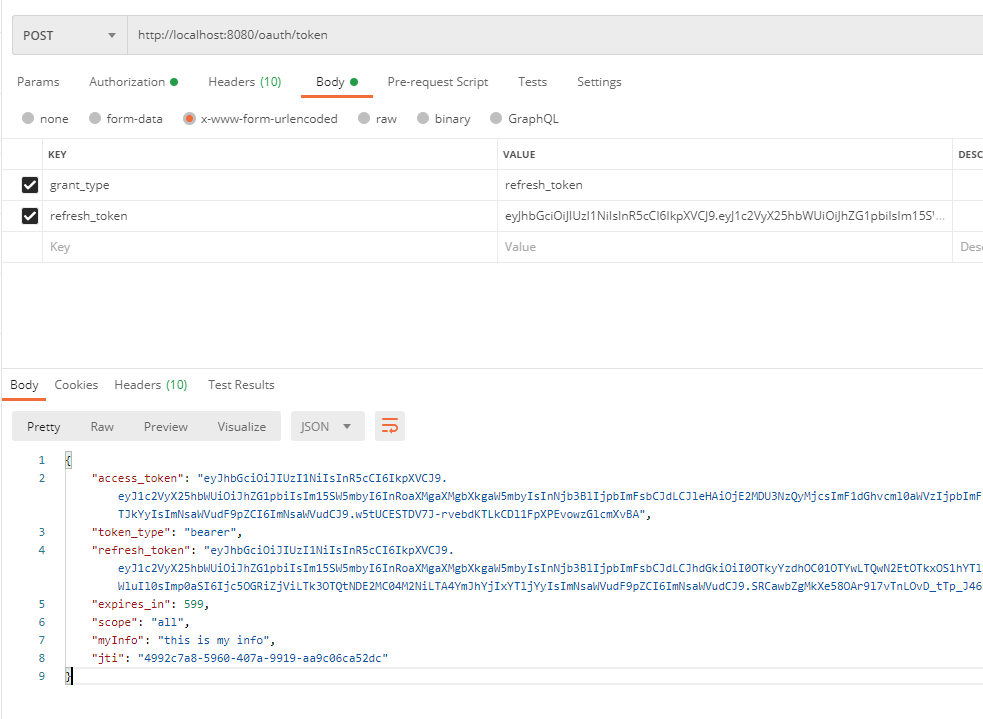
{
    "access_token": "eyJhbGciOiJIUzI1NiIsInR5cCI6IkpXVCJ9.eyJ1c2VyX25hbWUiOiJhZG1pbiIsIm15SW5mbyI6InRoaXMgaXMgbXkgaW5mbyIsInNjb3BlIjpbImFsbCJdLCJleHAiOjE2MDU3NzMzODgsImF1dGhvcml0aWVzIjpbImFkbWluIl0sImp0aSI6IjU2YmUyZDc0LWVhM2QtNDc0YS1iZTI5LTUzYmQ3YTlmODgzOSIsImNsaWVudF9pZCI6ImNsaWVudCJ9.XFoevQ5_k5D3qCubcbxIVJyfqX1bH_ZE7yWxBPcA-g0",
    "token_type": "bearer",
    "refresh_token": "eyJhbGciOiJIUzI1NiIsInR5cCI6IkpXVCJ9.eyJ1c2VyX25hbWUiOiJhZG1pbiIsIm15SW5mbyI6InRoaXMgaXMgbXkgaW5mbyIsInNjb3BlIjpbImFsbCJdLCJhdGkiOiI1NmJlMmQ3NC1lYTNkLTQ3NGEtYmUyOS01M2JkN2E5Zjg4MzkiLCJleHAiOjE2MDYzNzc1ODgsImF1dGhvcml0aWVzIjpbImFkbWluIl0sImp0aSI6IjYxOWIyMzZiLTRmNGUtNGIwZi1hZWM4LThhODE2OTA3OGUwNSIsImNsaWVudF9pZCI6ImNsaWVudCJ9.J91Db2VSYvbd_PohIHT5nlFCzqlfvZmlMCEvZYBt1WI",
    "expires_in": 599,
    "scope": "all",
    "myInfo": "this is my info",
    "jti": "56be2d74-ea3d-474a-be29-53bd7a9f8839"
}
使用这个刷新令牌和之前的请求令牌大同小异
注意:在passwod模式下,执行刷新token时,抛出异常Handling error: IllegalStateException, UserDetailsService is required. 解决方法: 在
AuthorizationServerConfigurerAdapter中配置UserDetailsService对象 如下
@Autowired
@Qualifier("myUserService")
private UserDetailsService userDetails;

@Override
public void configure(AuthorizationServerEndpointsConfigurer endpoints) throws Exception {
    ...

    // 这里配置上自定义的 UserDetailsService
    endpoints.userDetailsService(userDetails)
            .authenticationManager(authenticationManager)
            .tokenStore(tokenStore)
            // 需要使用之前注入的转换器(将 accessToken 转成 JwtToken)
            .accessTokenConverter(jwtAccessTokenConverter)
            // 使用增强器
            .tokenEnhancer(chain);
}
Redis 存储 Token
配置环境
<dependency>
    <groupId>org.apache.commons</groupId>
    <artifactId>commons-pool2</artifactId>
    <version>2.8.0</version>
</dependency>

<dependency>
    <groupId>org.springframework.boot</groupId>
    <artifactId>spring-boot-starter-data-redis</artifactId>
</dependency>
整合到密码模式
把 TokenStore 注入进来
@Configuration
public class RedisConfig {
    @Autowired
    private RedisConnectionFactory redisConnectionFactory;

    @Bean
    public TokenStore redisTokenStore(){
        return new RedisTokenStore(redisConnectionFactory);
    }
}
在 AuthorizationServerConfigurerAdapter 配置这个存储模式,表示存储模式是使用 Redis
@Autowired
@Qualifier("redisTokenStore")
private TokenStore tokenStore;

@Override
public void configure(AuthorizationServerEndpointsConfigurer endpoints) throws Exception {
    endpoints.authenticationManager(authenticationManager).tokenStore(tokenStore);
}
这样启动时就会自动把令牌信息存到 Redis 里面去了,而不是继续使用 Session
RememberMe
故名思意,就是 “记住我” 下次就可以免登陆了,因为这个功能底层是依赖于 Spring-JDBC 的,所以最好使用 MyBatis 框架
添加依赖
<dependency>
    <groupId>org.springframework.boot</groupId>
    <artifactId>spring-boot-starter-jdbc</artifactId>
    <version>2.3.2.RELEASE</version>
</dependency>

<dependency>
    <groupId>mysql</groupId>
    <artifactId>mysql-connector-java</artifactId>
</dependency>

<dependency>
    <groupId>org.mybatis.spring.boot</groupId>
    <artifactId>mybatis-spring-boot-starter</artifactId>
    <version>2.1.3</version>
</dependency>
配置连接池
spring:
  datasource:
    driver-class-name: com.mysql.cj.jdbc.Driver
    url: jdbc:mysql://localhost:3306/security?useUnicode=true&characterEncoding=utf8&useSSL=true&useServerPrepStmts=true
    username: root
    password: root
在启动类加上注解
添加配置
在配置之前先来了解下这个 PersistentTokenRepository 接口,这个接口的实现是用来存储 RememberMe 的信息
public interface PersistentTokenRepository {

    void createNewToken(PersistentRememberMeToken token);

    void updateToken(String series, String tokenValue, Date lastUsed);

    PersistentRememberMeToken getTokenForSeries(String seriesId);

    void removeUserTokens(String username);

}
其有两个默认的实现类 JdbcTokenRepositoryImpl 和 InMemoryTokenRepositoryImpl
InMemoryTokenRepositoryImpl 是把用户信息存在内存中
JdbcTokenRepositoryImpl 则是存储到数据库中
将这个 PersistentTokenRepository 注入到 Bean
@Autowired
private DataSource dataSource;

@Bean
public PersistentTokenRepository persistentTokenRepository() {
    JdbcTokenRepositoryImpl jdbcTokenRepository = new JdbcTokenRepositoryImpl();
    // 设置数据源
    jdbcTokenRepository.setDataSource(dataSource);
    // 自动创建一个表(第一次启动时开启,第二次注释掉)
    jdbcTokenRepository.setCreateTableOnStartup(true);
    return jdbcTokenRepository;
}
添加 remember-me
@Autowired
private PersistentTokenRepository persistentTokenRepository;


@Autowired
private UserDetailService userDetailsService;

...

http
        .rememberMe()
        // 因为默认的参数名是 remember-me,而前端不支持名字里带 - 所以这里重命名为 remember_me
        .rememberMeParameter("remember_me")
        // 存放的数据源位置
        .tokenRepository(persistentTokenRepository)
        // 设置超时时间,默认是两周
        .tokenValiditySeconds(60 * 10)
        // 自定义的登陆逻辑
        .userDetailsService(userDetailsService);
前端测试
使用前端端分离,基本配置和之前一样,这里加个 rememberMe
<div>
    <span>记住我:</span>
    <input type="checkbox" v-model='remember_me'>
</div>
axios.post('/doLogin', qs.stringify({
              username: this.username,
              password: this.password,
              remember_me: this.remember_me
          })
点击 “记住我” 登陆后就会在数据库里插入一个 Token

然后下次服务器重启就可以无需登陆,可以直接使用需要权限的请求了(退出登陆也会自动把表里的 Token 清除掉)
注意:别忘了运行一次后把
jdbcTokenRepository.setCreateTableOnStartup(true);注释掉,不然会报错